For each of the persons who participated in Pam Junk's ME challenge, she sent a participation prize. This consisted of two printies to make little houses - a gingerbread house and a ME bookhouse.
After my initial assemble of this wee house, I decided it needed to be elevated (nicer) and so I found a plastic box it would fit in and added a base.
Here was my thought process:
The plastic box I found was fairly tall relative to the wee house, so I decided it needed a base to raise the house up above the black bottom and fill the clear top without being too high.
Build a base from paper
I pulled out my green scrapbook paper and cut and assembled a simple base (an inverted box). Then when I fit it into the plastic box I realized I had the same problem with the roof I had with the 1:48 scale one - the bottom of house is set to the edge of the base, but my roof wasn't so the house was tilted when in the plastic cover. (This won't do at all.) To solve this problem, I just trimmed the roof.
Next I wanted 'grass', so I pulled out my landscape materials and found a green that matched the paper I had used. I spread glue on the base and proceeded to cover with this fine green foam. Only I realized too late that the foam wasn't fine enough. So I scraped off that foam and then ended up cutting around the house to remove from the paper base.
Build a foam core base
Rather than cut out another paper base, I thought about what other way could I achieve my goal. Normally I would be using foam core or builders foam. Foam core I use is roughly quarter inch thick and builders foam is closer to half an inch. I decided the foam core was the better height.
Using foam core meant I would need to hide the foam.
I cut a strip of black paper (also scrapbook paper scraps). I cut it long enough to wrap around, but I measure to one side, then bent the corner neatly, then did for the next one. But I forgot to do for the next side. (I'm sure I was in too much a hurry to use glue which tends to get me in trouble.) So I glued to the first and second side. That's when I realized forgot to do the third bend. But I was able to do it before I glued. The last bend wouldn't have been needed if I hadn't somehow got the first side a tiny bit off. Rather than trimming at the last corner I had to trim a little extra to wrap around at the bend. It worked out ok. (The reason I didn't measure and bend all four was due to my concern that the foam core wasn't exactly square to the one inch I had cut to.)
Landscaping the base
For the step and the flagstone I used paper. The step from a thicker paper and the flag stone from thin paper. I glued the step in front of the house and painted it, Then I painted a brown path for under the flagstone. Then I cut strips of the thin paper, then cut into random squares and rectangles, gluing them individually. After gluing both, I painted solid grey on the step and several colors on the flagstone, just dabbing here and there to give a stone look.
I decided to donate the green foam I had used previously and decided to not use. The reason is the color seems too bright almost neon for my taste. I had never used it that I can recall for that very reason - the color seemed unnatural.
Instead I used a mix of yellow and mostly green that I had in my stash. I am not sure if the product comes that way, or if someone had mixed it. This is the very fine foam that gives a fairly close layer which is closer to scale for this wee little house, (although probably a foot high in real life scale.)
For landscaping, I also use a material that comes in clumps. To get these wee little bushes, I just tore off tiny pieces and glued them around the house.
Decorating the base
The bigger ME book house had wood veneer added to it that I then painted black. I also added a cutout detail around it. Then I had painted white polka dots. I didn't havemuch room to do that on the paper covered foam core base, so I left it as black. (Using colored paper was cool, since I didn't have to paint.) Instead I added the same cutout detail to the black plastic base of the box. Now the wee house and the bigger one coordinate.
I do not have any micro scale furniture at the moment so the interior is empty.
In 2010, I made some cute cats. They are known as the Scaredy Cats, but they really are the Fraidy sisters. I have now written three stories about them, but haven't completely finished them. Writing stories isn't the same as making minis.
In 2013, I made some more cats and sold them on my etsy site. It was this second group that inspired my third story.
But none of them really had a home. The stump I made as a test for another stump project has been stored away for a long time without any furnishings. I did use it as a backdrop for a how to article I wrote for Miniature Collector on my twig furniture. That was in the March 2011 issue.
This how it was when I set it aside.
In September, after finishing up my ME book house, I thought about what I would do next. I thought about some kits I had ran across during that time and remembered the carrot furniture ones. I had previously thought I might use the Pam Junk ones, but when I went to my kit box, I also found some by the Betterley's. I briefly considered those and when back to Pam's. I felt they would fit better in this round stump house.
Bedroom
I made the bedroom kit up first. I initially thought I would not make the quilt rack. I just felt it wouldn't fit. I didn't realize how small the rooms are using a salt box. My last round house was an oatmeal box so it had a little more space.
One difference I did in building this kit was using round toothpicks for the carrot posts instead of the provided dowels that had to be sanded. I snipped off the very tip of them to make them more stable. I was afraid that in handling I might break the tip or bend it at the very least. I also cut them longer than the dowels so I could make the leaves from the same piece. I used my craft knife to score and cut the end; score to mark the start of the leaves; and then to carve away to make the leaves. After that I used it again to cut V's in the leaf area being careful to avoid splitting it off completely. Then I used a file to shape the carrot top at the base of the leaves.
Living room
I next made up the living room set. I decided to use this fabric because it had the orange but wasn't overpowering. Orange is not my thing, but touches of it especially in this project was acceptable. But I was limited to what I had on hand so I wasn't going out to buy anything.
I had to be really careful cutting out the fabric as I didn't have much of this fabric.
I looked to see if I had anything else for the table, but decided on the maroon fabric and doing the skirted table from the kit. I also debated the lamp and choose it as well. I did add a long orange bugle bead.
I found the welcome rug in my swap stash. The round rug fabric was from a supply swap. I cut it out round thinking that I wanted a center rug. (I decided later to not use it because it was so thick it made the furniture tilt back.)
In trying to decide what else to add or do, I kept thinking something wasn't right with the colors I had used so far. Then I noticed that the couch/chair fabric was off white and the bedroom I had done in a creamy white. That's when I pulled out my jar of antiquing medium. (I've had this bottle for 20+ years and it still works the same.) I used a small brush to smear it over a portion at a time and then used a piece of paper towel and tweezers to wipe it off.
I was extremely pleased with the results of the stain.
My next adventure was to paint these two plastic pieces. I used some black paint that I really liked for other things, but it was not so great for plastic. (Note to self - use regular acrylic for plastic). I had to cover it with 4 coats to get it to an acceptable finish. The books themselves went faster as I used regular acrylic paint.
You can see this was before I finish coating the legs and outer part of the bookcase. The table was something my dad had given me along with some other plastic items. It may be HO scale as the other things seem smaller. I used some bronze paint and then some triple thick to get the shine.
Kitchen/Dining room/patio
The next kit I used was also from Pam Junk was the kitchen/dining set.
I assembled this similar to the other in that I used round toothpicks again.
I really loved the table and chairs. This is a finished pic but before I antiqued.
I thought I didn't have room for the cart from this kit so didn't build it yet.
I was also considering if the roof would be the kitchen. One problem being that the floor wasn't completely level on the roof.
I even dug out a BPF stove thinking that is what else I needed. But it really didn't fit in my mind's eye. So back to the flagstone patio and the stove was put back in my stash.
Roof table and stools
Since I decided not to use the carrot furniture on the roof, I needed something else. So I explored my stash and came up with these.
I was thinking the flowers could be decoration.
It was really an a-ha moment with these carrots. I have several collections of rabbits that include various extras. Things like flowers, houses, eggs, ducks and these carrots. I decided I could do something with these for my table and chair needs.
So out comes my handy dremel tool with a cut off wheel. (Note to self - use a box or something to contain the dust as it was everywhere in my studio afterwards.)
One of the stools I cut off too much green leaves, but I was able to hid it in the back. The floor then became an asset as the height difference isn't noticeable.
The round circle to the left on the table top is a stack of plates. I needed something to go in the hutch. So I looked at dishes/plates images on the web to find some l liked. I printed them on several different types of paper including shiny photo, matte presentation paper and plain copy paper.
The shiny paper is what ended up using for the plates I made both for the party and in the hutch.
In the hutch, I did add paper to the back part of the shelves and used that same type of paper and printed pattern to make the napkins. Napkins were folded in half once.
The plates were cut using two different size hole punches. The cabbage leaf ones I then used the tip of my craft knife to trim their shape and a round stylus to add dimension.
The domed cover on the bottom shelf is made from a flat backed google eye. The white plastic back is cut off and it leaves the clear part. Then I used a orange bead for the handle. Inside it is some donuts I made for a swap in the past. They are seed beads that I dipped in paint.
The teapot is a flat backed decorative item I purchased from Alpha Stamps.com
The carrot decoration hanging from the trees is made using cross stitch thread, copy paper I trimmed and then added holes so I could string them. Were I to make such again, I would fold over a portion instead. I felt I should string them because the carrots were on a string in the printie I used so I was covering it up. But it would hardly be noticeable with right color thread.
I also would have used a set of string led's that I have out on the roof patio. But I had already wired this for 12v battery and wasn't willing to add the led's because it was mostly finished.
Food
The carrot cake on the table was a swap, but I changed the plate for a green sequin. The tea pot on the table was from Alpha Stamps.com as well.
It was around this time I decided I wanted the cart, so I made it as well. The only other change to it besides the toothpicks was to use a different wire for the handle.
You can also see the side view of the stools in this picture.
The other food I came up with was:
Carrot sticks - dried up orange paint cut into slices and then trimmed to fit the plate (a 1/4" green sequin).
Dip for carrot sticks - I had this nice silver bead cap. I filled it with white dimensional paint and inserted the spoon (from a metal etched set) while the paint was still wet. Then glued the dip bowl to the center of my green sequin for carrots.
Two tier gold dish - I made these for a prior swap using a gold colored sequin pin and two flower sequins. I may have cut the sequins from larger sequins and then shaped using my ball stylus. I don't remember exactly.
Candied carrots - dried up orange paint cut up into little bits. (top of the two tier dish)
Chocolate dipped carrots - more dried up orange paint cut into strips and dipped in brown paint (bottom of the two tier dish)
Plate of carrot cookies - the plate is same the as ones from the top shelf of the hutch and cookies are tiny round punches with a dot of orange color.
Chocolate carrot cake - the cake was a swap I received but on a different plate. I replaced the plate with the green sequin and added the carrots to the top. I added dimension by using glue and more than one coat of paint.
This is also a good pic to see the detail of the toothpick carrots. To get the dimension to the carrots was just from the paint being allowed to create ridges. I realized late in the carrot making another way would be to add some scores with the craft knife because the antique medium would have added to the carrot look. But since I hadn't done it with others, I wouldn't add it now.
Worms - these two characters were given to me by my dad. I suspect something found at a yard sale or thrift store. They both needed a tiny bit of paint touch up.
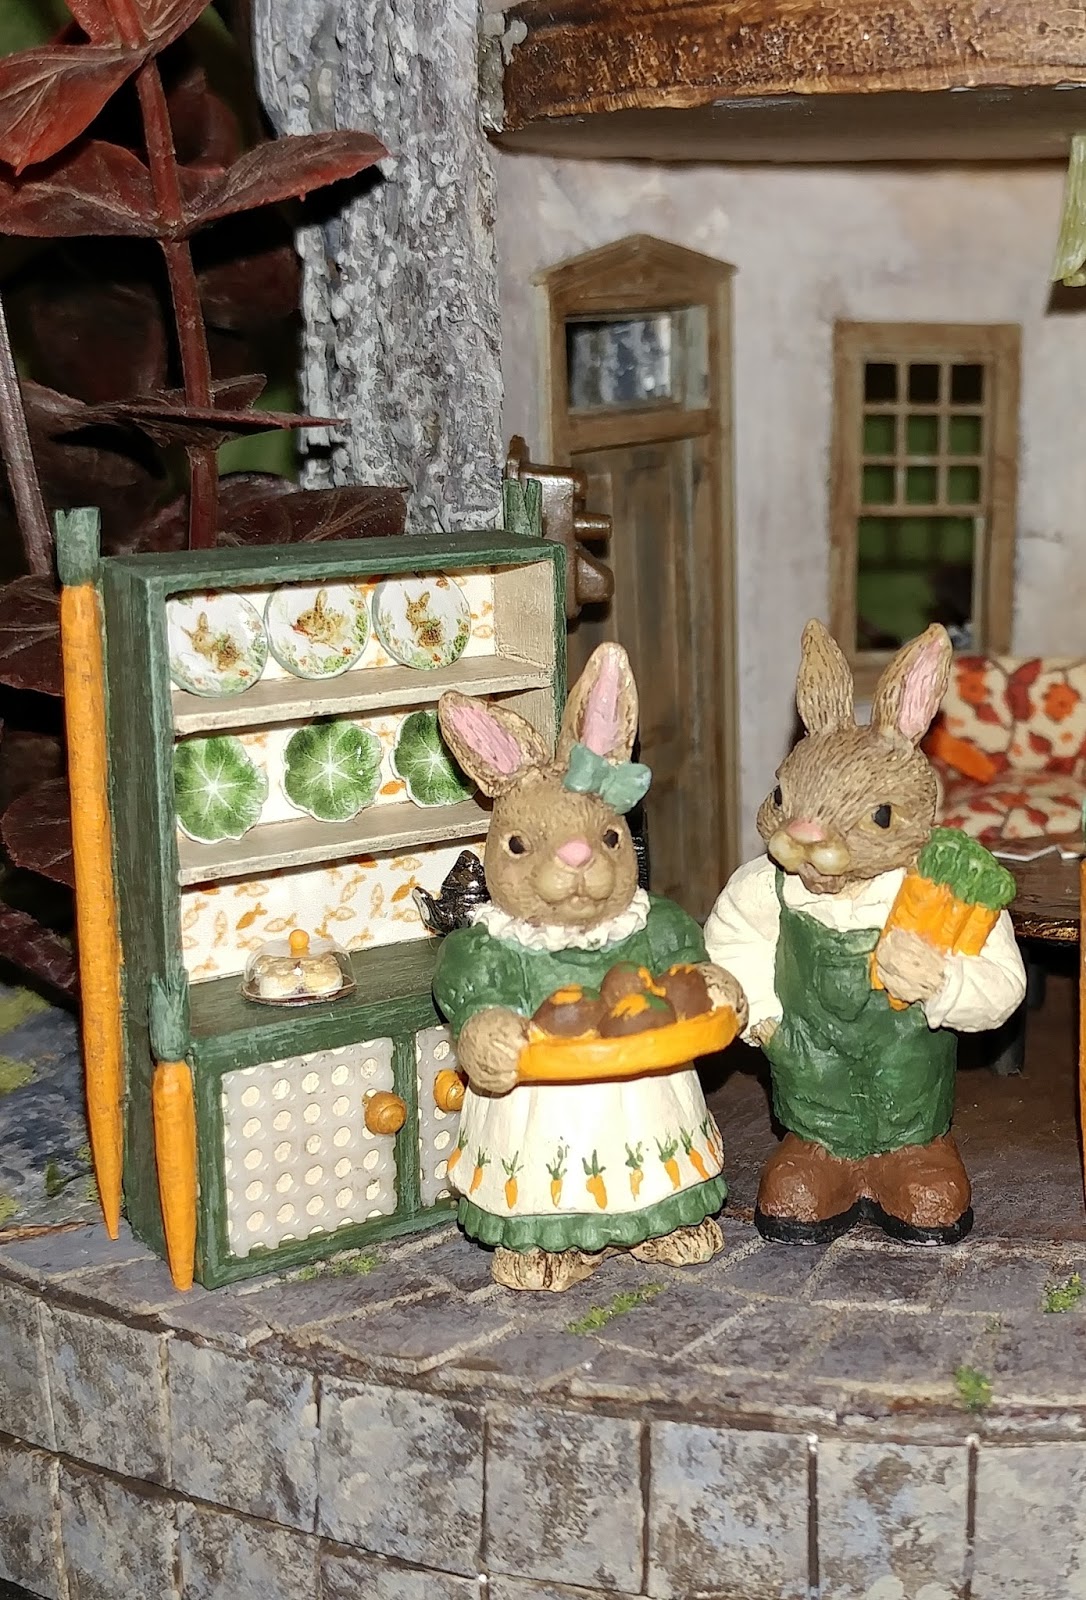
Rabbits
In looking at the carrots for the roof table, I found these two that were part of a set but sort of extra. As you can see in this pic, the girl rabbit is missing an ear. I also had another of the boy rabbits that was missing an ear so I just removed the other ear as well. I glued the ear on her after I removed the grassy base from her feet using my dremel tool.
Both them got a full repaint to match and be not pastel. I was really pleased with the ear and the paint job so that the line is nearly undetectable.
The last thing I needed to do was cover the base. I choose to use the cut up cardboard to make flagstone the same as I did previously for the patio. After I applied the cardboard and painted it well, I was ready to add the dirt (just like the patio) but then realized I needed grout instead.
Well that required me to add it and I decided to use some white dimensional paint to do so. I picked it because it had a small tip to dispense it. I found it to work very well for what I needed, so I think in the future will buy a few other colors. In this stone process, the grout then needed painted as well as the stones again. In this picture can see the previously painted stones on the far left. In the middle is the paint going on, to the right is still same paint. In this pic is seems to look better, but was actually watery so had to redo that section.
I used a paper towel, old credit card and my finger to wipe the excess. My finger was the better option.
This white paint was shiny so I had to be careful to not go over the layer of brown paint or it would remove it instead.
Final result
To see the finished project and read the accompanying story - check out the album on my picturetrail site.